
SAP HCM TIP: IMPORT A LARGE NUMBER OF PERNRS INTO YOUR SAP REPORT SCREEN
May 14, 2017
Frequently, when conducting testing, data audits or data validation activities, I find myself utilizing a standard SAP HCM report (such as flex), or Ad Hoc Query, to extract certain employee master data detail for review or compare purposes. When working with a specific set of employee records, the same employee data set, or a set of PERNRs might be used over and over in the selection area of your report. This means that, to limit the report output to only your specific employee set, you could have to enter dozens, or even hundreds, of PERNRs into the SAP report selection area every time you use a report for the first time.
*NOTE: If you run the same report numerous times with the same selection criteria, you would save the report as a variant so you could re-use it with the same parameters.
Here is a quick tip on how to import a large number of PERNRs into an SAP report or program selection screen, eliminating the need for you to enter this data one number at a time.
STEP 1
The numbers you want to import into your SAP report selection window should be stored in one column of an excel spreadsheet. In Figure 1, you will see a sample spreadsheet with employee PERNRs in column A.
*NOTE: The data to be imported does not have to be in column A; it can be in any column of the spreadsheet.

Figure 1
Step 2
Select the PERNR values from the column – these are the PERNRs which will be imported into the selection screen in your SAP report, query or program.
Do NOT include the header cell in your selection. So for the selection example in Figure 2, you would capture only the numbers starting in row 2 – do not select the row 1 header ‘PERNR’.
There are several methods you can use to select/capture a large number of values in a column. (See Figure 2 for the view of selected column entries)
One method:
Select the top-most cell in the desired range (in our example, cell A2)
Hold down ‘CTRL’ and ‘SHIFT’ on the keyboard and then press the down arrow key
This will select all of the cells in the range as long as there are no empty cells in the range.
Another method which you can use to select (this also works if there are empty cells in the range):
Select the first cell in the desired range.
Scroll down to the end of range (which is usually the end of the sheet) by using the scroll bar.
Press ‘SHIFT’ and then select the last cell in the range
This will select all of the cells in the range.
If there is a very large range of cells and you don’t want to scroll through lots of pages, you can use this method:
Click the first cell in the range to select it, and then click in the Name box at the left end of the formula bar

Name Box
Type the cell reference of the last cell in the range that you want to be selected
Hold down ‘SHIFT’ key while you press ‘ENTER’.
This will select all of the cells in the range.
If you know the first and last cells in the range, you can use this method:
Click on the first cell to be included in the range. The cell number should display in the NAME box in the upper left of the formula bar.
Enter a colon after the cell number in the NAME box, followed by the last cell number for the range. For example, when ‘A2’ displays in the NAME box, enter ‘:A2340’ to get the entry of ‘A2:A2340’ in the NAME box.
Click on the ENTER key.
This will select all of the cells in the range.
A final method for selecting a large range of cells is as follows:
Click on the first cell to be included in the range
Click on the F5 function key, the ‘Go To’ dialog box will be displayed.
In the Reference field of the box, the first cell in the range is displayed. Enter a colon followed by the last field number for the range.
Click on the OK button at the bottom of the dialog box.
This will select all of the cells in the range.
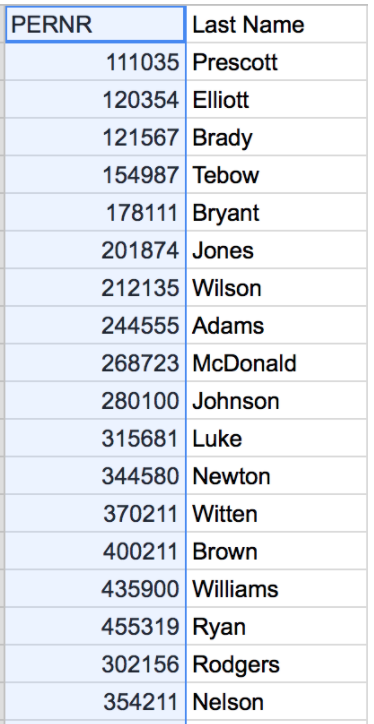
Figure 2
Step 3
Press the keys ‘CTRL’ plus ‘C’ to copy the selected range of PERNRs. The numbers will be placed on the clipboard.
Step 4
Go to the selection screen or window for the SAP report or program you plan to execute.
Step 5
In the field for ‘PERNR’ selections, click on the icon for ‘further selections’ to open up the ‘Multiple Selection’ dialog box, as illustrated in Figure 3.
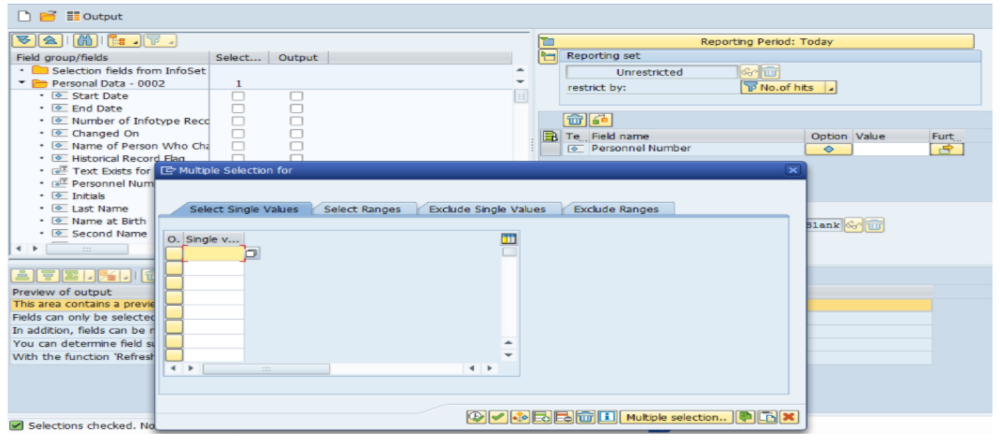
Figure 3
Step 6
Select or verify that you are displaying the ‘Select Single Values’ tab in the selection box, as shown in Figure 4.

Figure 4
Step 7
Click on the Shift key with the f12 key – this will load the selected PERNRs from the Clipboard into the selection values column, as displayed in Figure 5.

Figure 5
Step 8
Click on the ‘x’ in the upper left corner of the Multiple Selections window to close it or click on the execute button (clock with checkmark)..
Step 9
Execute the report or program.
Although this example uses the PERNR selection field as an example, you can use this method to import any large number of selection criteria the first time you run a report or program (saving the report as a variant for future use!).