
SAP SUCCESSFACTORS TIP: ONBOARDING - CUSTOMER ADMINISTRATION OF NOTIFICATIONS
February 10, 2017
SuccessFactors Onboarding solution supports onboarding processes for New Hires and Hiring Managers. One of the valuable features available with Onboarding is the ability to send notifications to people who participate in the onboarding processes. For example, a hiring manager can notified to begin the onboarding process, a new hire can receive a welcome email with information explaining the next steps to take, or a third party can be notified with details about providing the new hire’s uniform or equipment.
The notifications are initially configured by the Onboarding implementation partner. But, after go-live, a customer administrator can manage them or create a new notification. Three common activities the customer administrator may need to perform include changing the email texts, disabling a notification and checking for notifications in the mail queue. Here is a quick how-to for those tasks for version Q3 2016.
Changing a notification text
From the Onboarding Dashboard, select Notifications. Then select the notification group from the list on the left side of the screen. The notifications in the group are displayed on the right side of the screen.
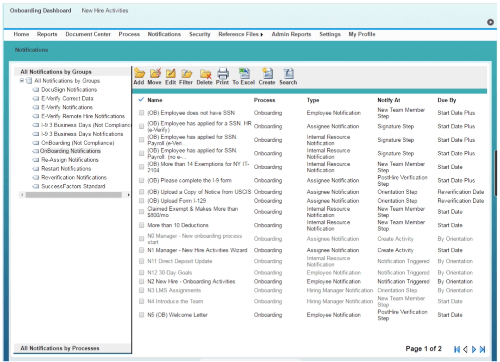
Select the name of notification you want to change from the list on the right side of the screen. The functions available on the toolbar are different depending whether you select the checkbox for the row or select the name of the notification.

Select Email from the newly added icons on the toolbar in order to view or edit the email text.

Several types of texts can be defined for a Notification, including an initial email text, text for a reminder email, and text for when an item is complete. Select the type of text you want to change from the menu bar. Now, you can change the text as needed. In the text, the items in curly brackets are references to database fields which are resolved when the notification is sent. To apply and save the changes without closing the window, click Apply. Click Submit to close the window and save the e-mail notification in the database.
Disable a Notification
A notification can be quickly and easily disabled from the main Notifications screen. When you have selected the name of the notification on the right side of the screen the Disable icon is available on the toolbar. Select Disable and the task is complete.

The icon will toggle to Enable and the notification row in the list will be gray.

Monitor the Mail Queue
From the Onboarding Dashboard you can find the mail queue under Settings > Mail Queue. You can search for mails by date, subject, recipient and status and other attributes. The results list shows details to aid in selecting the correct notification. (Some details below are removed for privacy.) When you select a notification from the results list you can view details about the notification by pressing view on the list’s toolbar or by looking at the audit trail for the notification.

We hope these tips help you understand some of the tasks an Onboarding customer administrator can easily accomplish.